Understanding The Dental Cleaning Process From Start To Finish
You may feel tense before a cleaning. You are not alone. This guide walks you through each step so you know what to expect from start to finish. First, you check in and share your health history. Then your hygienist looks at your teeth and gums and removes plaque and tartar. Next, your teeth are polished and flossed so every surface is clean. Finally, the dentist in Andover reviews your mouth, explains any concerns, and answers questions. You leave with a plan to keep your mouth strong at home. You deserve clear facts, not guesswork. When you understand the process, you can speak up, ask for breaks, and feel more in control during each visit.
Why Regular Cleanings Matter For Your Health
Cleanings protect more than your smile. They protect your whole body. Plaque holds germs that can move into your blood through sore gums. That can strain your heart and raise other health risks. The Centers for Disease Control and Prevention explains that gum disease links to heart disease, diabetes, and pregnancy problems.
You may not feel pain until damage is deep. A cleaning visit finds small problems early. Early care costs less, takes less time, and saves teeth. You also teach your children by your example. When they see you go for cleanings, they learn that mouth care matters.
Step 1: Check In And Health Review
The visit starts at the front desk. Staff confirm your name, contact information, and insurance. Then they ask you to update your health history.
You should share:
- New diagnoses like diabetes or heart disease
- All medicines and supplements
- Pregnancy or plans for pregnancy
- Allergies to medicines or latex
- Recent surgeries, hospital stays, or infections
- Any fears about dental care
Your mouth connects to the rest of your body. This review keeps you safe. It also guides which tools and medicines the team uses.
Step 2: X Rays And Initial Checks
Next, the team may take dental X rays. These pictures show bone, roots, and hidden decay. The dose is low. The U.S. Food and Drug Administration notes that modern digital X rays use very small amounts of radiation.
The hygienist places a shield over your body. You bite on a small holder while the camera takes quick pictures. Children and adults who get decay often may need X rays more often. Others may need them less.
Typical X Ray Frequency By Risk Level
| Risk Level | Examples | Usual X Ray Schedule |
|---|---|---|
| Low risk | Few or no cavities, strong home care | Every 2 to 3 years |
| Moderate risk | Some past cavities, mild gum issues | Every 1 to 2 years |
| High risk | Frequent cavities, gum disease, smoking, diabetes | Every 6 to 18 months |
These time frames are general. Your dentist may change them based on your needs and age.
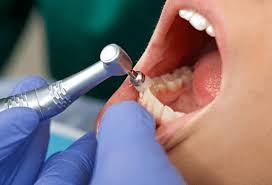
Step 3: Gum Check And Plaque Removal
The hygienist checks your gums with a thin measuring tool. You hear numbers called out. These numbers show the depth of the space between tooth and gum. Small numbers usually mean healthy gums. Larger numbers can point to gum disease.
Then the hygienist removes plaque and tartar. Plaque is a soft film. Tartar is hardened plaque that you cannot brush off. The hygienist uses:
- A hand tool that gently scrapes tartar
- Or an ultrasonic scaler that uses water and vibration
You may hear scraping or feel pressure. You should not feel sharp pain. You can raise your hand if you need a pause. This step cuts your risk for cavities and gum disease more than brushing alone.
Step 4: Polishing, Flossing, And Fluoride
After tartar removal, your teeth are ready for polish. The hygienist uses a small rubber cup and a special paste. This smooths the tooth surface and removes surface stains from food, coffee, or tea.
Next comes flossing. The hygienist slides floss between each tooth. This clears any leftover plaque or paste. It also shows which spots bleed. Bleeding often points to gum inflammation.
Many offices finish with fluoride treatment. Fluoride helps harden tooth enamel. It lowers the risk of decay. It may come as a foam, gel, rinse, or paint-on varnish. You might need to avoid food or drink for a short time after.
Step 5: Dentist Exam And Treatment Plan
Once your teeth are clean, the dentist enters. This timing is important. A clean mouth shows small problems that might hide under plaque.
The dentist:
- Reviews your X rays
- Checks each tooth for decay, cracks, or wear
- Looks at your gums, tongue, cheeks, and roof of the mouth
- Assesses your bite and jaw movement
- Screens for signs of oral cancer
Then you hear a clear summary. You learn what is healthy, what needs watching, and what needs treatment. You also hear timelines, costs, and options. You can ask for plain language and written notes.
Step 6: Setting Up Your Home Care Plan
The visit ends with a plan you can follow at home. The dentist or hygienist may suggest:
- Brushing twice a day for two minutes with fluoride toothpaste
- Daily flossing or use of interdental brushes
- Mouthwash if your gums bleed or you get many cavities
- Changes in snacks or drinks to cut sugar and acid
- Quitting smoking or vaping
You can ask for a brushing and flossing show and tell. Children and adults both gain from watching and then trying the steps in the chair. You can also ask about pastes or tools for sensitive teeth.
How Often You Should Schedule Cleanings
Many people do well with a cleaning every six months. Some need visits every three to four months. Others with strong teeth and gums may only need a visit once a year.
In general:
- Children need cleanings at least twice a year
- Adults with gum disease often need three or four cleanings a year
- People with diabetes, smokers, and pregnant people may need closer checks
You can ask your dentist to explain the reason for your schedule. That way you know it fits your risk and not a habit.
Taking Control Of Your Dental Visits
Fear and shame keep many people away. You may worry about pain, cost, or judgment. A good dental team respects you. You can set ground rules before the cleaning starts.
You can:
- Ask for a stop signal such as a hand raise
- Request slow steps and short breaks
- Use music or headphones
- Bring a support person if the office allows it
- Ask for numbing gel for tender gums
You deserve clear respect during every visit. When you understand each step from check in to check out, you turn a stressful chore into a planned act of care. You protect your teeth. You guard your health. You also give your children a strong model of courage and self respect.
read more : 4 Common Treatments In Periodontics That Support Implant Care